Usage-based pricing with free trial
AWS pioneered combining usage-based pricing with a product-led go-to-market motion, where customers select the hardware and tools required for their project and then are only billed for the resources consumed. This minimizes barriers to entry and allows each company or independent user to enter at a price point they are comfortable with, with a predictable pathway to increasing scale and spend.
One key to AWS’ continued growth and success has been its use of free tiers and trials across the product portfolio. This allows users to enter the product and begin using without any friction, and only prompts them for payment after affording the user the opportunity to experience the full product value.
Follow this template for a step-by-step guide to get started implementing an AWS-style pay-as-you-go billing model for your business. This guide will detail how to define metrics, track usage, and build flexible usage-based pricing models from your product catalog based on dimensions such as region, instance type, and availability zone.
After creating the pricing plan, we will walk through the different options for creating and managing free trials and tiers with Amberflo.
How it works
AWS offers hardware that customers can use as-a-service and then pay only for what is used rather than the purchase and upkeep of proprietary infrastructure. Customers can select the instance type with the specifications and performance capabilities that are best suited for the intended use case. Then for each instance type, AWS sets the hourly rate based on a number of dimensions such as the AWS region the service is accessed from and the operating system (OS) in use.
Here is a section of pricing data for AWS EC2 for AWS region US East 1 to illustrate the concepts of instance types, their specifications, and the different hourly rates by OS.
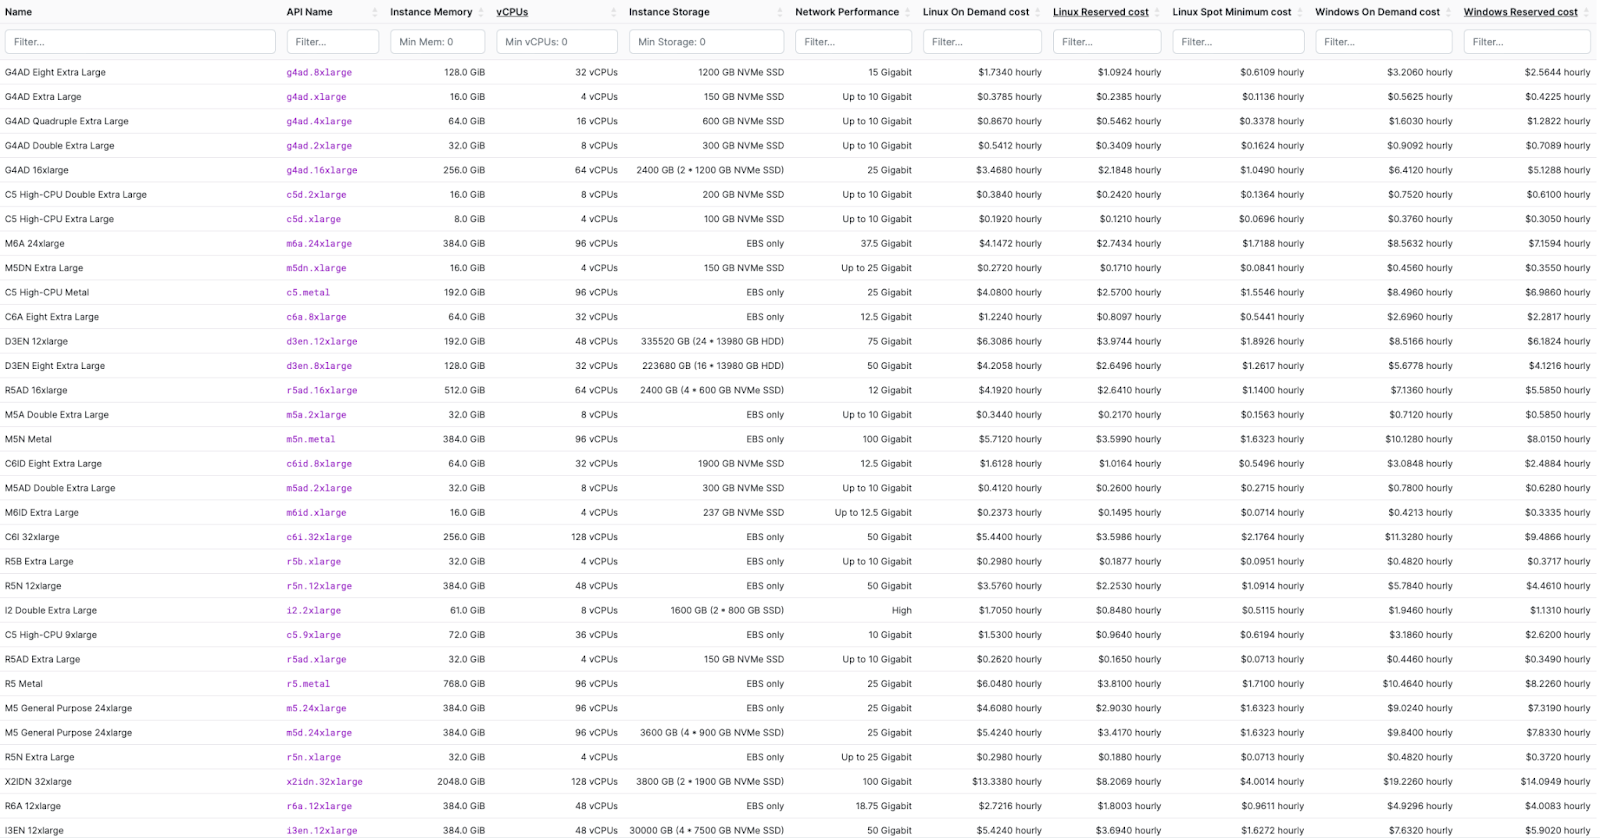
To keep things simpler for this example, we chose 2 instance types, C5 High-CPU Extra Large, and C5 High-CPU Metal and show the hourly rates across different AWS regions in the table below:
| us-east-1 | c5d.xlarge | $0.1920 |
| us-east-1 | c5.metal | $4.0800 |
| us-west-1 | c5d.xlarge | $0.2400 |
| us-west-1 | c5.metal | $5.0880 |
| eu-west-1 | c5d.xlarge | $0.2180 |
| eu-west-1 | c5.metal | $4.6080 |
| ap-east-1 | c5d.xlarge | $0.2460 |
| ap-east-1 | c5.metal | $5.1840 |
Instructions
We will walk through how to re-create this pricing model in Amberflo. The first step is to create an Amberflo account if you haven’t already (use this link - https://ui.amberflo.io/signup). See our Documentation for help getting your account set up and inviting team members to join.
Step 1: Create a meter to track compute consumption
Amberflo is a platform solution, with the metering service (Amberflo Metering Cloud) as the foundation and the billing service (Amberflo Billing Cloud) built as an integrated application sitting on top. Amberflo tracks and aggregates usage in realtime and applies your billing logic to that usage to generate the usage-based bill.
AWS’ EC2 pricing is built around a single meter - the number of compute hours of use for each instance.
There are two easy options for creating this corresponding meter in Amberflo depending on your reporting and latency requirements and your method of integration with Amberflo for event ingestion.
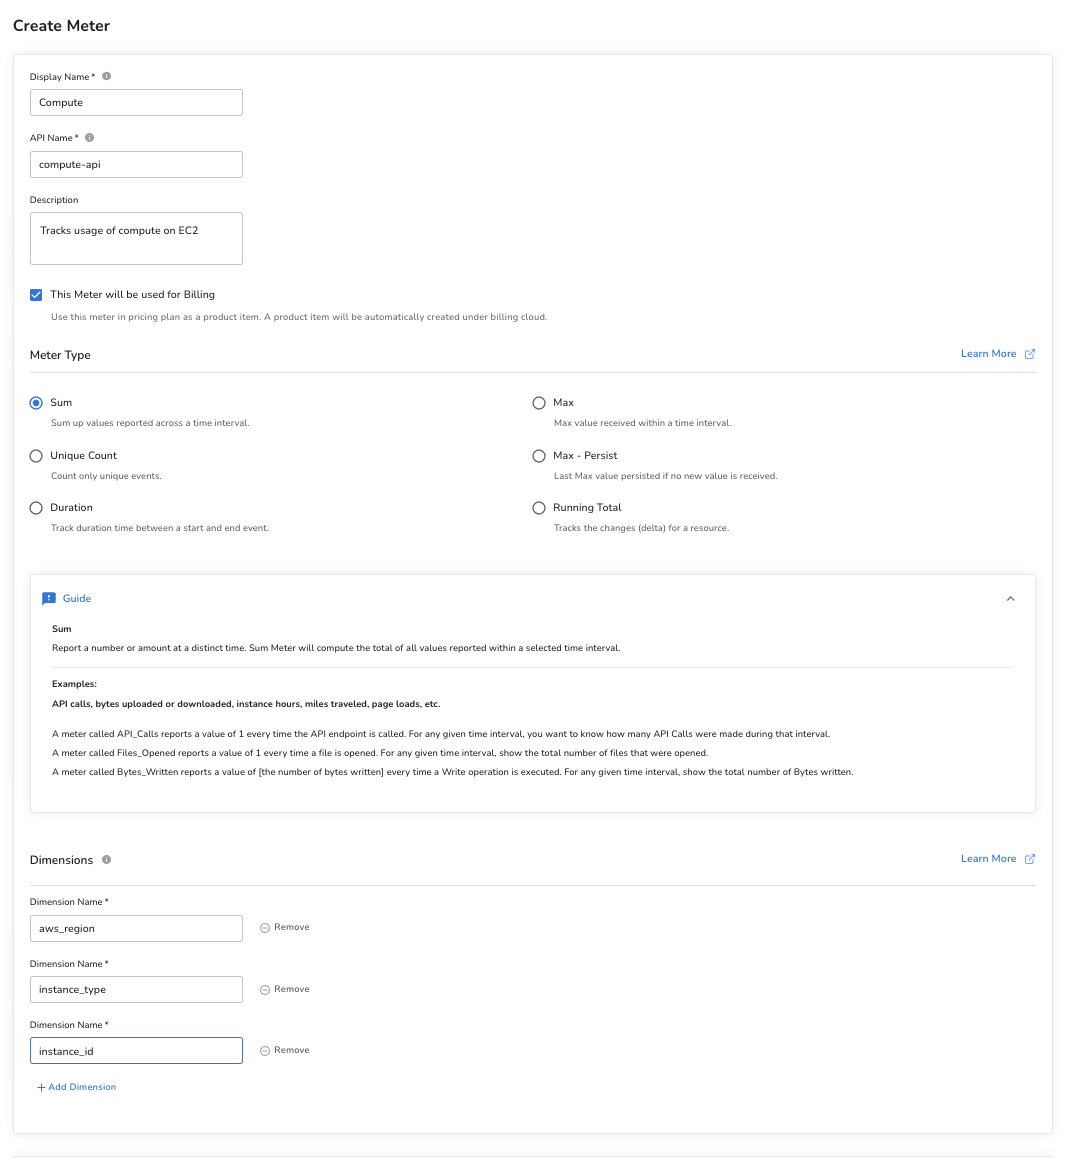
Option 1: We can use the ‘sum’ meter type and report usage for each instance when that usage concludes. This method is not events-based and instead depends on regularly reporting usage after it has concluded. There are more advanced options such as to automatically report usage every X hours by checking some usage table or database. For example:
06:00am - c5.metal instance activated on us-east-1
08:00am - same c5.metal instance deactivated
Total usage - 2 hours.
Send this 2 hours to Amberflo as a meter event the next time usage is updated in the system.
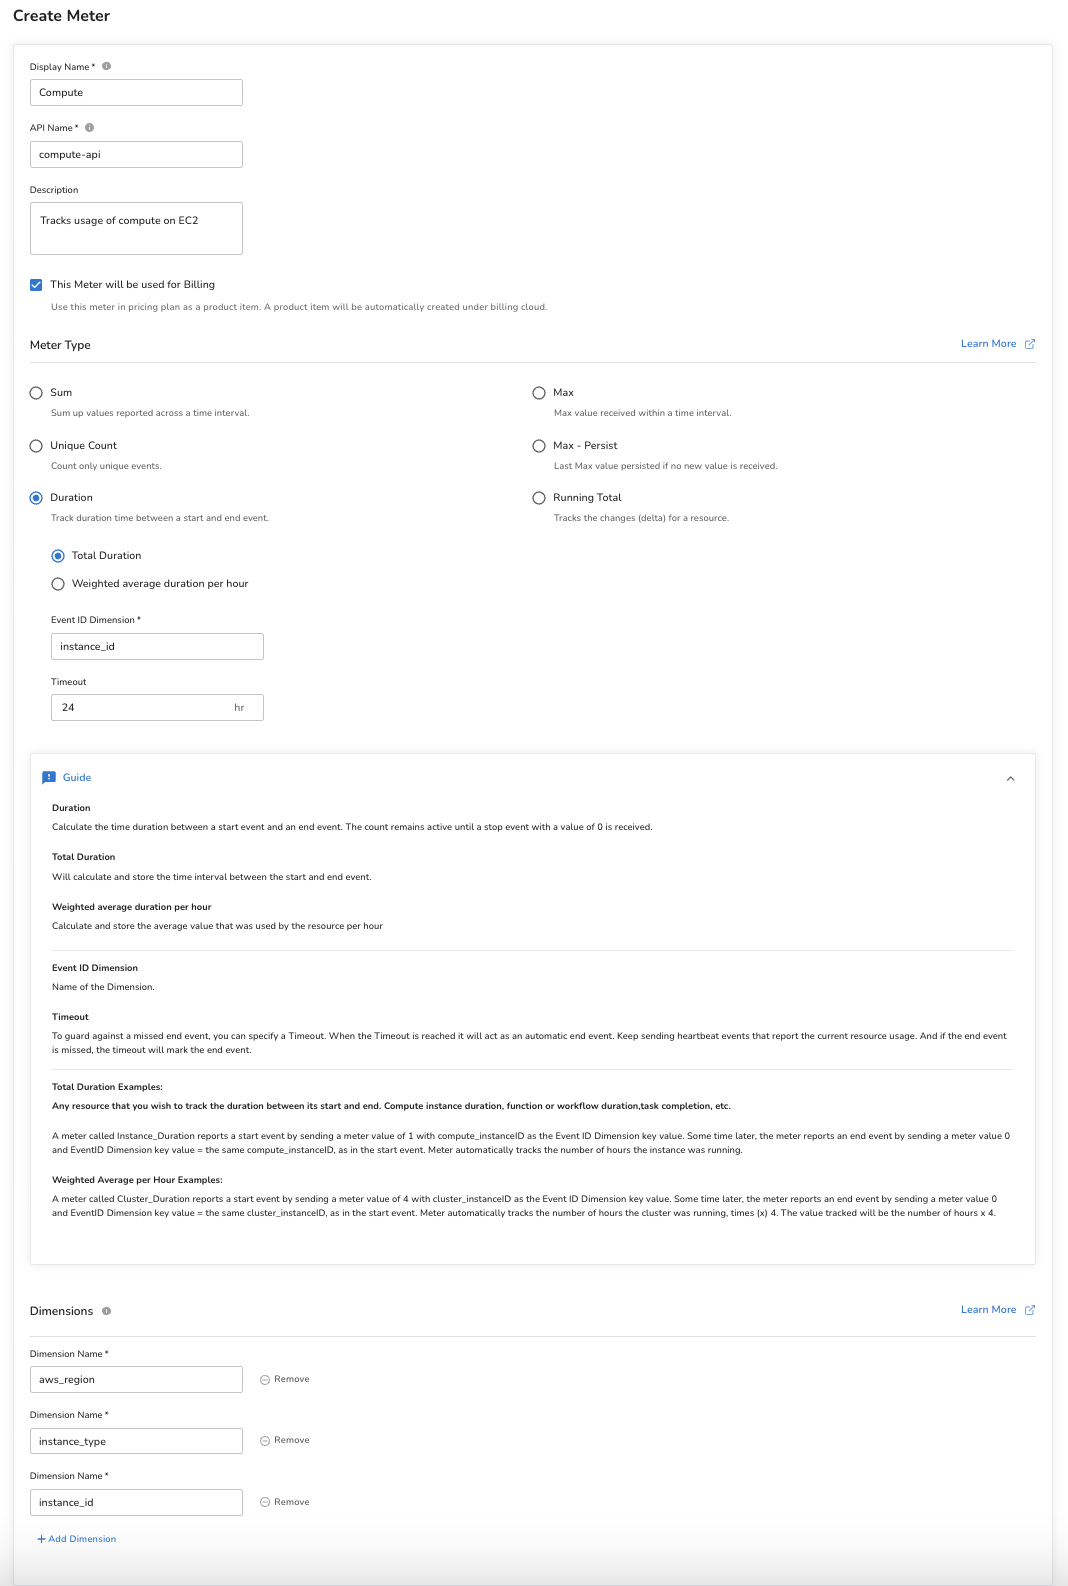
Option 2: We can use the ‘duration’ meter type, and report the usage for each instance in real time. This works by sending a start event to Amberflo when the resource usage commences, and a stop event when the usage concludes. A resourceID dimension is used to associate the start and stop events with each other (ie. sending the instance ID and the customer name with each start and stop event allows the system to associate the two events and automatically calculate the difference between start and stop as the total duration of usage. For example:
06:00am - c5.metal instance activated on us-east-1 (start meter sent to Amberflo containing the customer name, timestamp, and instance identifier)
08:00am - same c5.metal instance deactivated (stop meter sent to Amberflo containing customer name, timestamp, and instance ID)
Using Dimensions
Dimensions are additional metadata that is sent with each meter event that can be used to filter, analyze, or even create billing rules. In our example, there are two dimensions that are being used to create the pricing plan (in real-world AWS pricing, their are additional other dimensions used as shown in the pricing example above):
- The AWS region that the customer is accessing the service from.
- The instance type for the compute resource being accessed. Different instance types have different capabilities and memory specifications, so customers can select the instance that is optimized for their job.
We’ve also added a third dimension, instance_id, which is a unique code or tag given to each instance, allowing it to be identified. For the duration meter, this is the dimension used to associate the start and stop events.
Including these dimensions with each meter event will allow us to filter and analyze usage by AWS region and instance type. These dimensions are also the foundation for the billing logic we’ll build in later steps.
Example meter data structure:

Step 2: Deploy meters to track usage
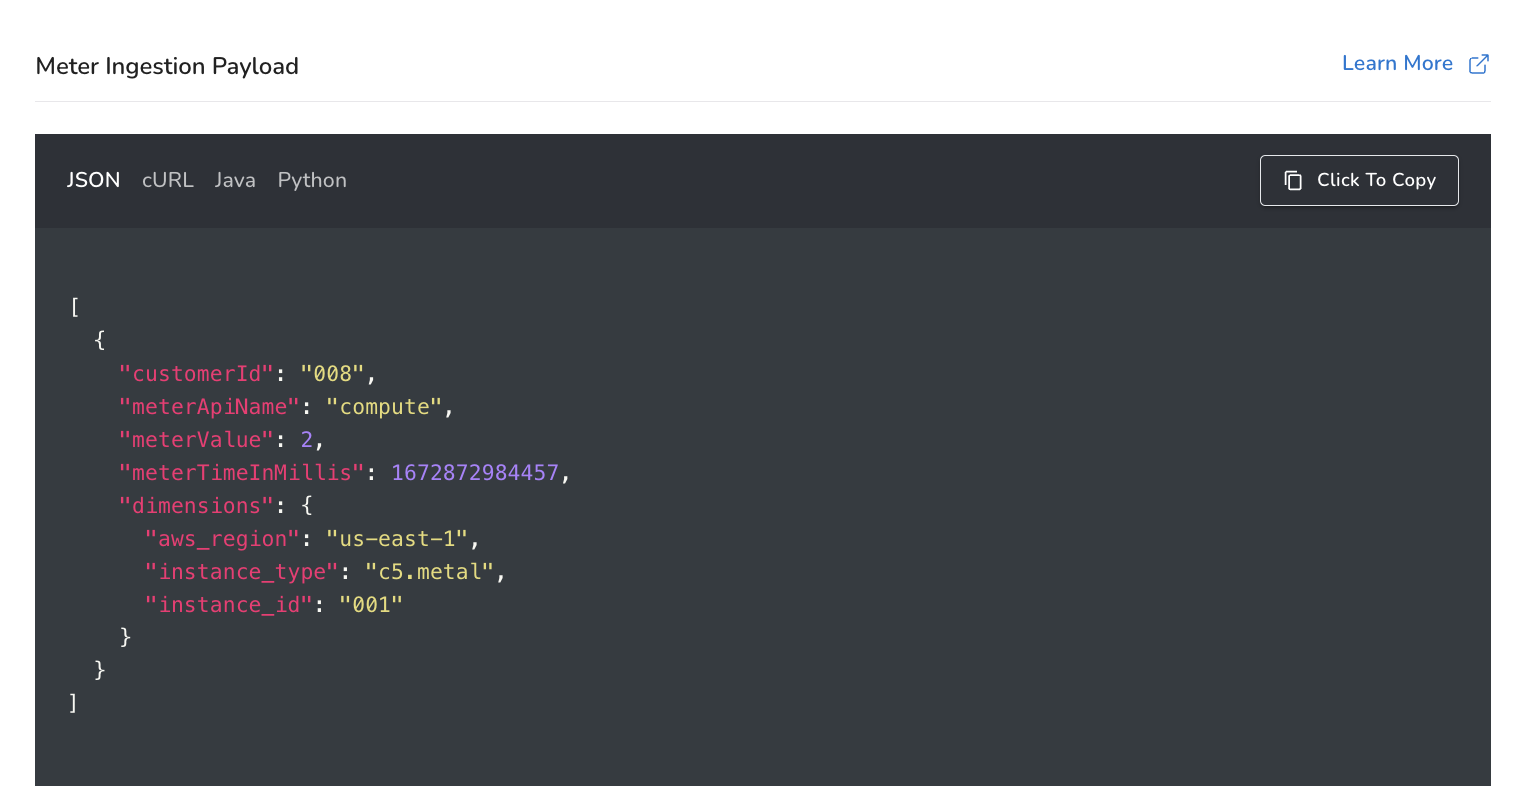
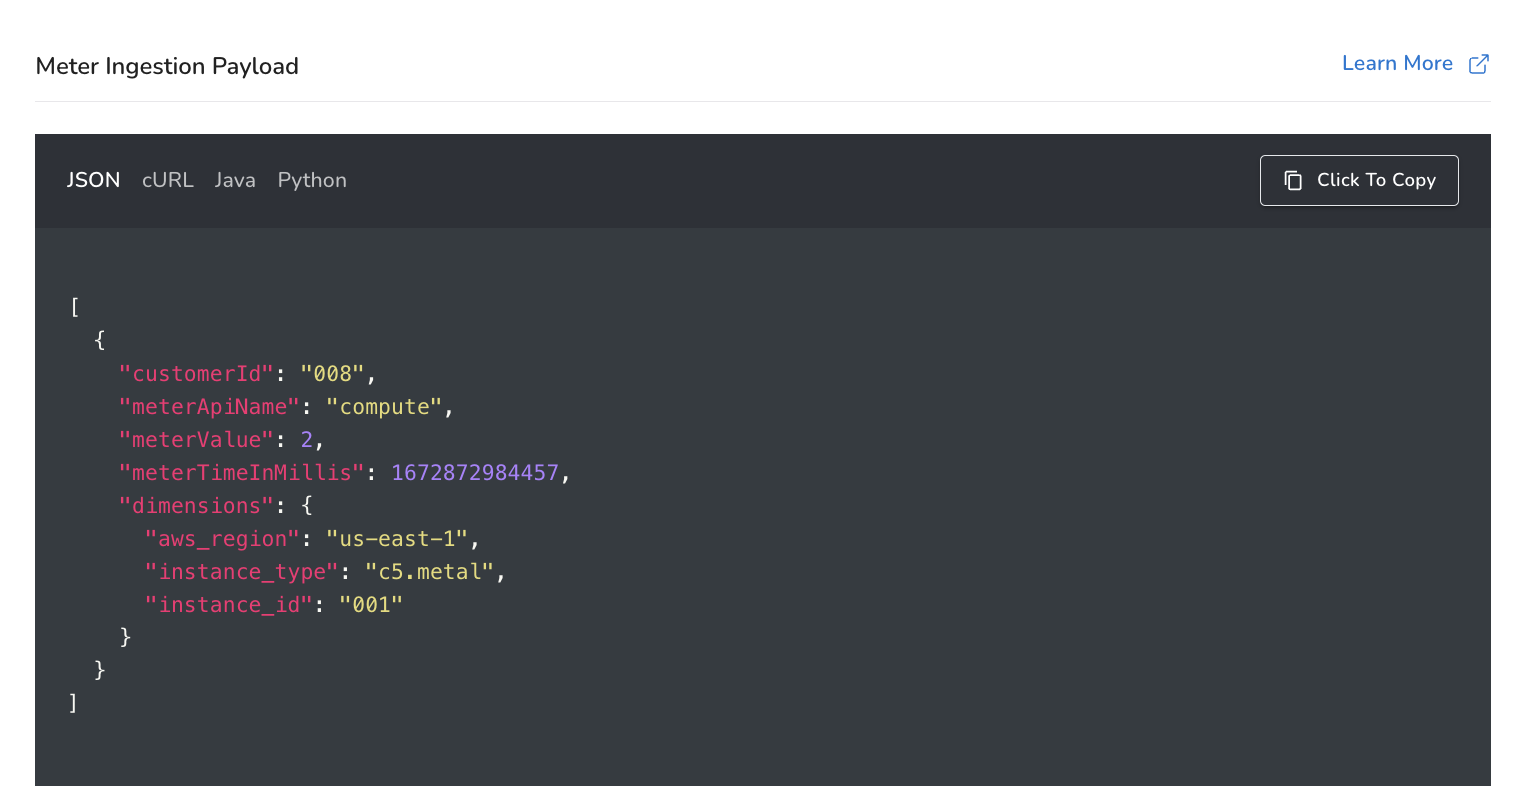
As users consume compute resources, AWS records the usage period. In Amberflo, this usage would be sent as meter events. Below is an example of what the meter event payload would look like (using a sum meter from Option 1 above):
You have several options for integrating your solution with Amberflo to ingest usage to the metering system. We provide SDKs in several common languages; an ingestion API; and we enable meter ingestion from files, databases, and other common tools including:
- AWS CloudWatch
- AWS S3
- AWS SQS
- Elastic Logstash
- MongoDB
- Databases and JDBC
- Files
- POSTMAN collections
- Kong API gateway
For step-by-step walkthroughs on how to use each ingestion method, please refer to our documentation.
Here is the SDK information: https://docs.amberflo.io/recipes
Here is the API reference: https://docs.amberflo.io/reference/post_ingest
Here are the docs on other ingestion options: https://docs.amberflo.io/docs/cloudwatch-logs-ingestion-1
Once the meter ingestion pipeline is configured, usage will be tracked and aggregated (by customer and by all custom dimensions you included) in realtime. You can visualize and query the usage data from the moment it is ingested.
Step 3: Create the pay-as-you-go pricing plan
When creating a new pricing plan, the first step is to name the plan and set the billing period. Next, you create product items that will make up your plan. These are the items in your catalog that you will charge customers for using; each product item should be associated with a meter which tracks usage for that resource.
AWS offers a pay-as-you-go pricing model for its services including EC2, so there is no subscription fee, startup fee, or other recurring charges. The bill is entirely based on the compute consumed.
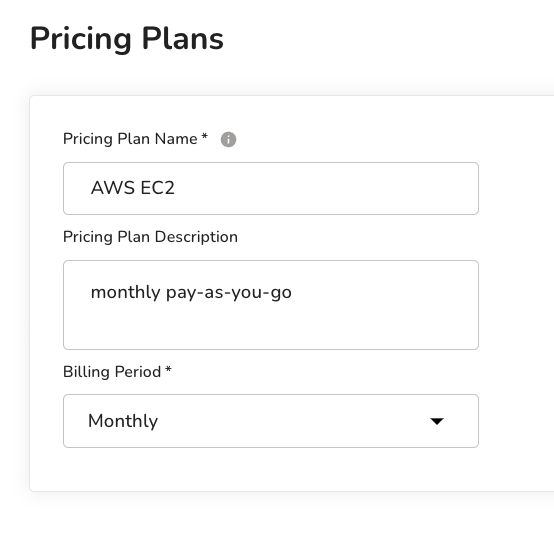
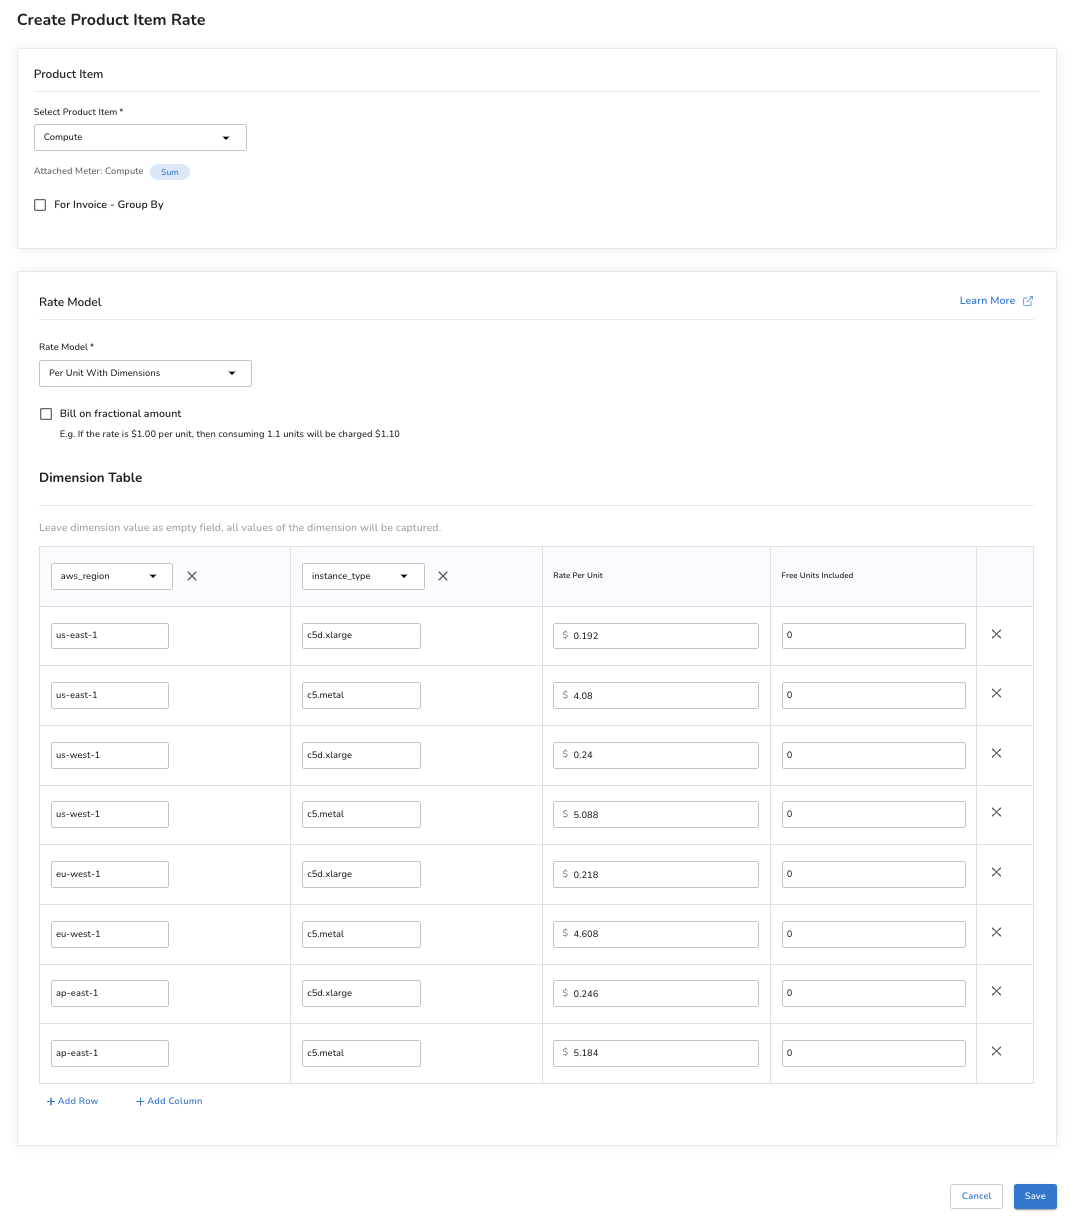
In this example for EC2, compute is the only charge vector, so there will only be a single product item. We will select the ‘By Unit with Dimensions’ pricing model, and then set the rates according to the region and instance type (see the table in step 1 above).
Step 4: Create free tiers and trial periods
Amberflo offers several different options to build and manage free trials depending on your business model and requirements.
Free Tier
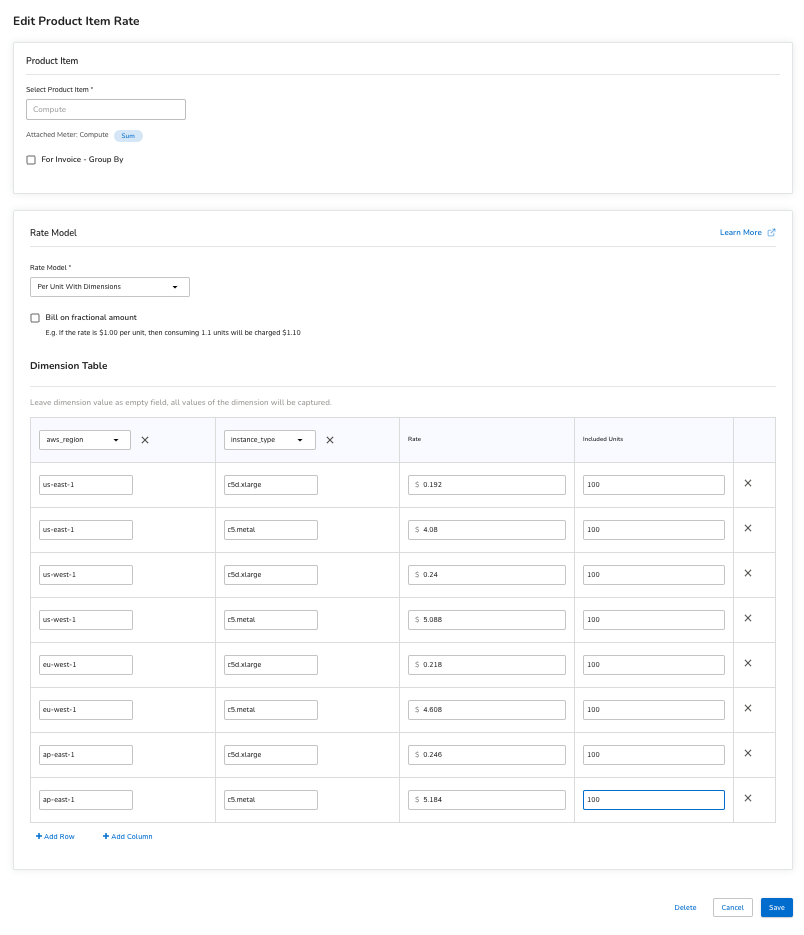
The simplest option is to leverage the concept of ‘Included Units’ when setting the product item rates in Amberflo to create a free tier.
Using the same rate table as above, choose some number of free units to include for each dimension value. You have the ability to configure a unique number of free units for each row on the rate table, for example, to minimize free usage on the most expensive hardware. As usage takes place, Amberflo will track it against the free units and automatically begin billing once the free units are consumed. Note that with this strategy, the free units are included in the pricing plan definition, so the count will reset at the start of each billing period.
One-time, unlimited free trial
To create a one-time free trial that is not limited by a time period, create the pricing plan as normal, but give each new signup a certain number of prepaid credits for free upon signing up. To do this, navigate to the main customer view for the customer you are looking to create the trial for.
Under the ‘Prepaid Credits’ card, select ‘Add Prepaid Credits’. Provide a name for the transaction, and be sure ‘One Time’ is selected. After saving, return to the customer view where the prepaid transaction just created should appear, along with a status that says ‘Requires Action’ and an option to ‘Activate’. Click ‘Activate’ and input ‘trial’ for the transaction id.
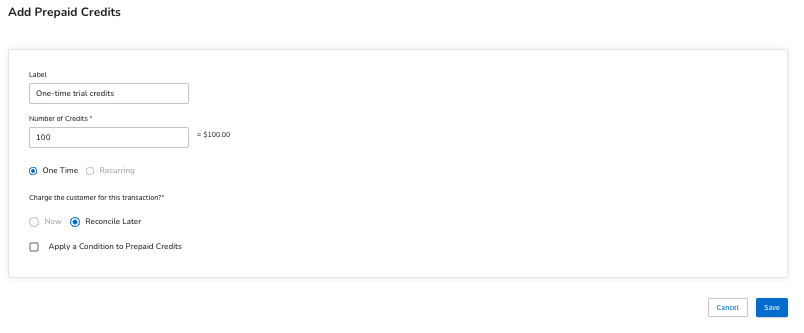

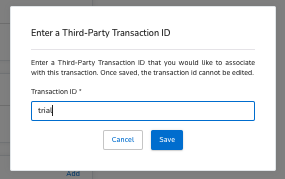
Now the credits should appear in the customer’s balance. As usage occurs, credits will be drawn down from the balance. When the balance reaches zero, the customer will be billed as normal.
One-time, limited time free trial
To create a one-time free trial that is limited to a certain time period (typically something like first week free, first month free, etc.), use the Promotions module to create a 100% discount, with an alert to notify to transition the customer to the paid plan (this can be automated in practice via API).
First, identify the length of time that the trial period will be valid for. For this example, suppose that the free trial period includes the first month after signup before automatically kicking into the paid plan from the second month going forward.
Select ‘Pricing’ from the main navigation menu in Amberflo, and choose ‘Promotions’ from the dropdown menu that appears. Select ‘Create Promotion’ and give a name (“Free Trial”) and description.
Select ‘Percentage Promotion’ and input 100 as the percentage amount. Under ‘Promotion Duration’ select ‘One-Time’. In the section titled ‘Promotion Applicable to’ choose ‘Pricing Plan’. This means that the promotion will be applied to all items in the pricing plan. Selecting ‘Product Item’ will restrict the promotion to only the selected product items, while the other product items in the plan will be billed normally. When all details are complete, select the toggle on the bottom of the page to activate the promotion, and select ‘Save’.
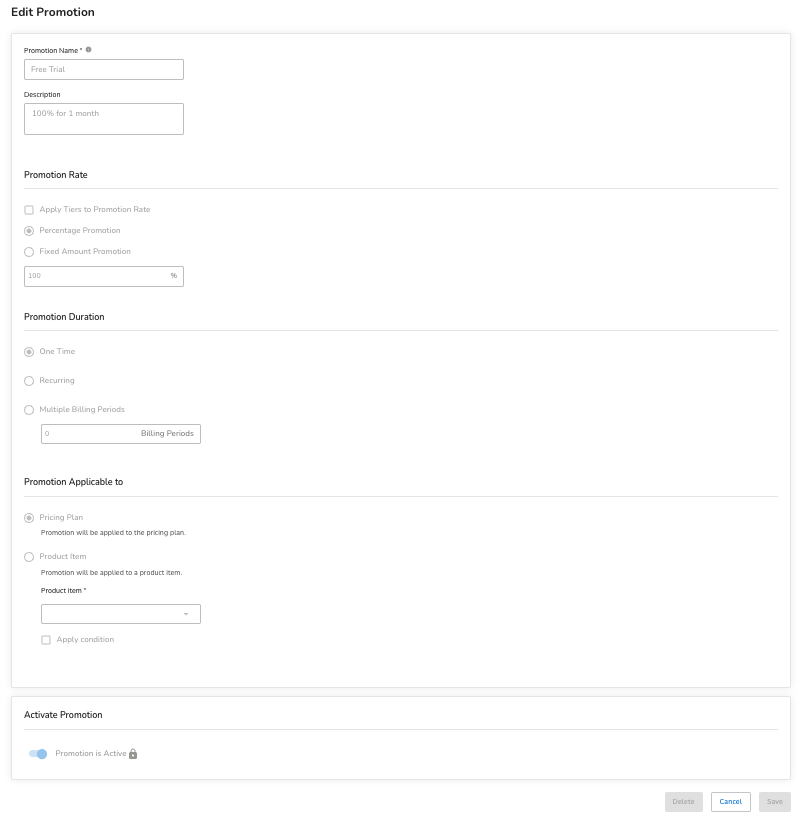
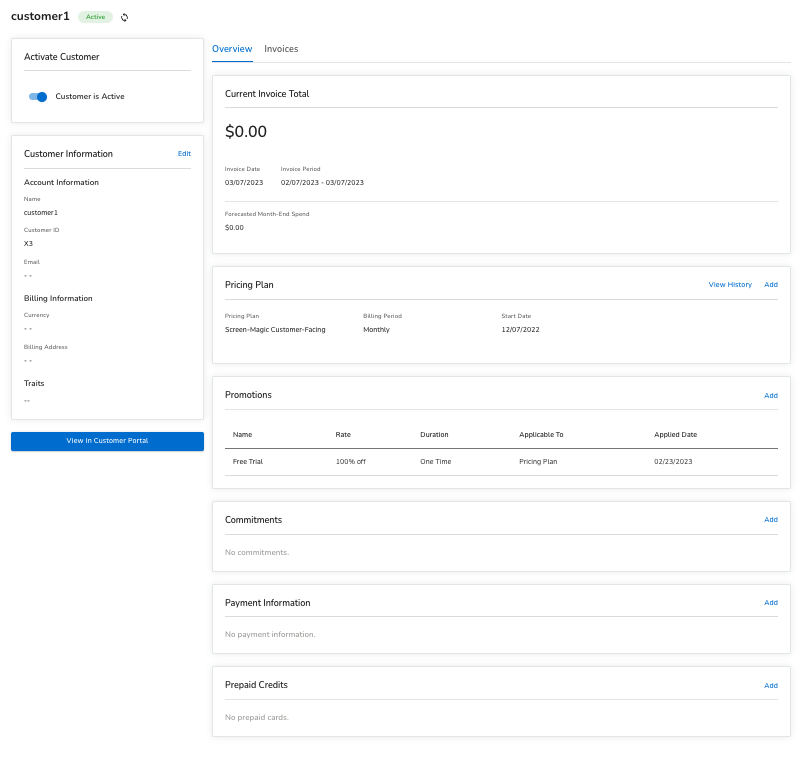
Next, navigate to the main customer view for the customer you are looking to create the trial for. Under the ‘Promotions’ section, select ‘Add Promotion’, and select the promotion you just created called ‘Free Trial’ from the dropdown menu. This will apply the promotion to this customer and ensure they have one month free usage before the promotion expires and normal billing resumes.
Step 5 - Activate the plan and assign customers to begin generating invoices
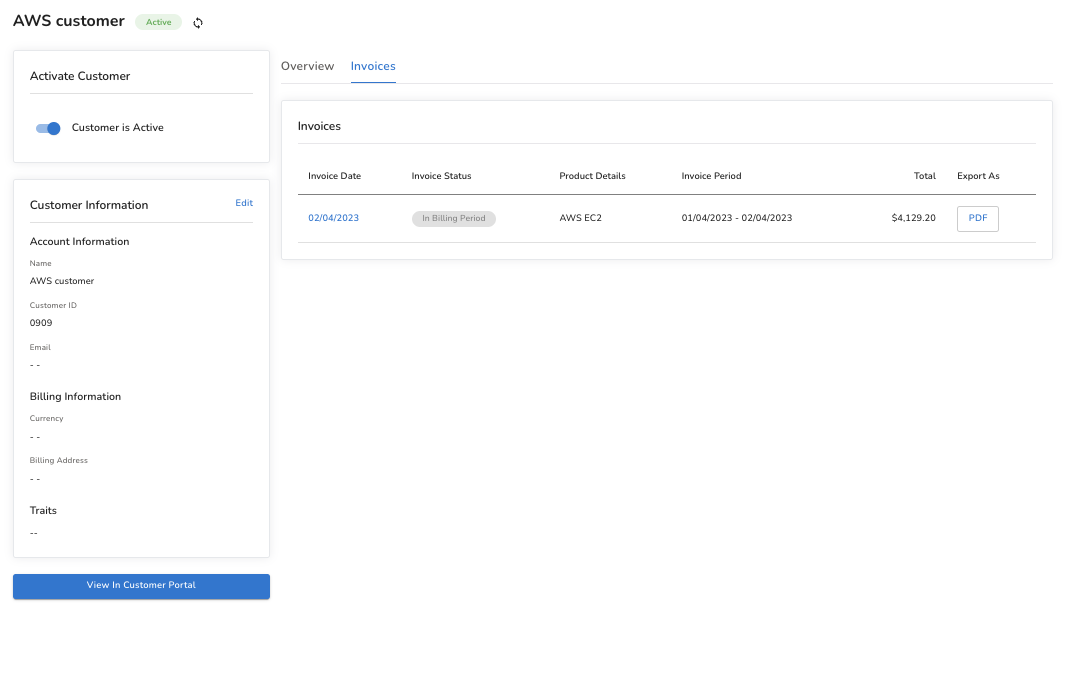
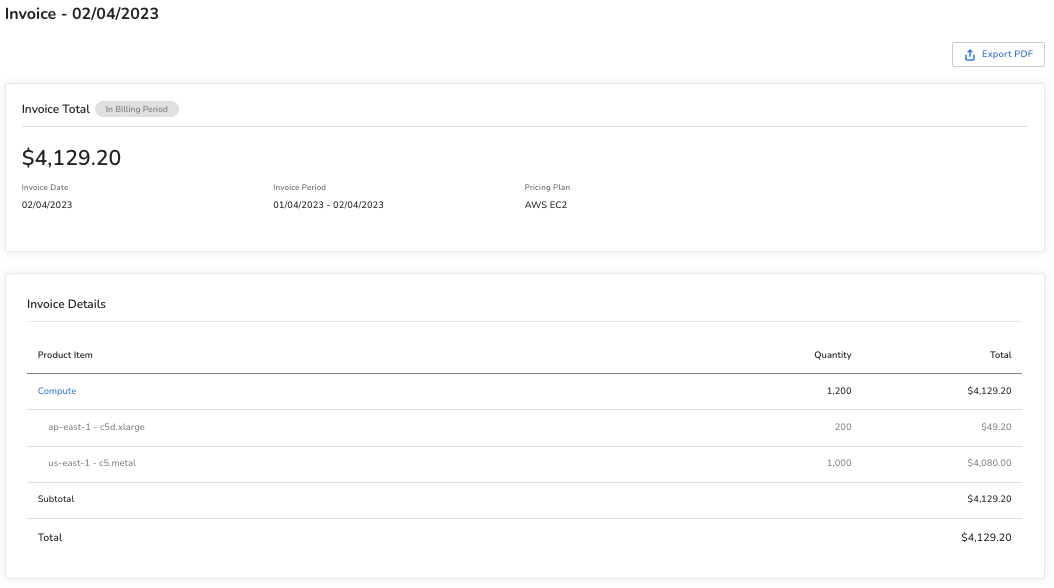
To begin generating invoices for usage, you must activate the pricing plan and assign the plan to customers. From the moment the plan is assigned, the billed amount will be calculated in real-time as usage occurs by applying the product item rates.
You can view the on-demand invoice at any point during the billing cycle by navigating to the customer view and selecting the invoice you’d like to view.
Pulling it together
Usage-based pricing with a pay-as-you-go model like AWS employs offers flexibility, transparency, and control for customers over their spend. It removes friction to increasing product adoption and synergizes perfectly with the PLG motion.
With Amberflo you can implement any custom variation of AWS-style pay-as-you-go pricing in minutes.
Get started today, click here to create your account and start building.
